01 May All About Brows
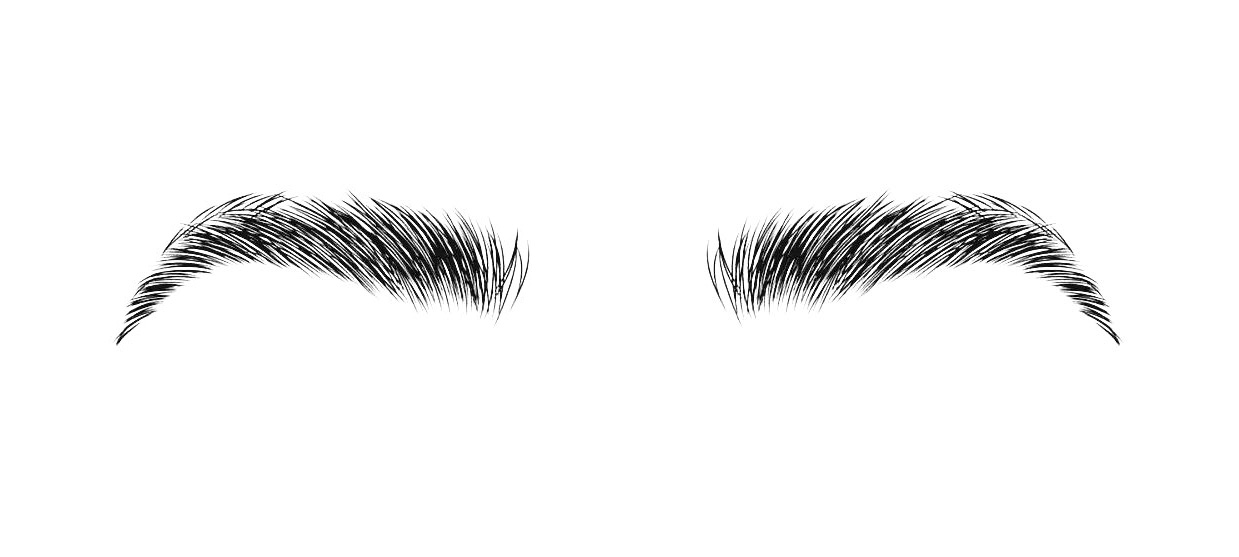
Probably the most frequently asked questions I get are about eyebrows. Eyebrows are a major feature on your face! No matter what you do or don’t do with them, it affects your face. Whether you have no brows, BOLD brows, thin brows, angled brow, thick brows…. eyebrows are IMPORTANT! They can completely change a face and they make a world of difference!
So… Let’s talk about size… you’ve heard it before, size DOES matter lol. This couldn’t be more true… regarding eyebrows I mean. Your brows should be proportionate to the rest of your facial features. There aren’t really any hard and fast rules when it comes to brows, but there are some guidelines that can create balance for your face. Better settle in cause this is a lonnngggg one!
First things first – Before we choose our brow shape we must determine our face shape!
Face shape
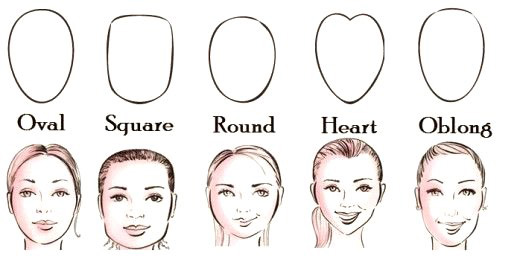
Oval Face Shape
– Forehead is wider than chin
– Prominent cheekbones
– Face tapers to a narrow chin
Square Face Shape
– Forehead, cheekbones and jawline are roughly the same width
Round Face Shape
– Face is basically as wide as it is long
– Face is widest at cheeks
– The jawline is quite angular
Heart Face Shape
– Forehead is wider than chin
– Prominent cheekbones
– Chin tapers to a point
Oblong Face Shape
– Forehead, cheekbones and jawlines are all about the same width
– Face gracefully tapers to a narrow oval chin
– Face is longer than it is wide
Once you’ve established your face shape, here are a few tips on how to choose your brow shape!
Please keep in mind this isn’t a mathematic equation and you should always do what makes YOU happy!
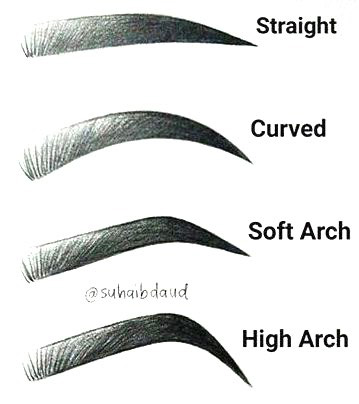
Choosing Your Brow Shape
Oval is considered the “ideal” face shape so your brows don’t make much difference in creating an oval face since it’s already oval! So if this is you… consider yourself lucky!!
Oval Face Shape
Basically any brow shape will work but my suggestion is an angled brow that gently arches but is still soft.
Square Face Shape
A thicker/stronger brow with an angled arch will balance out your jawline and give you a sassy bold look. However, if you’re looking to soften your overall appearance – try a thicker brow but with a more curved/rounded arch to soften your face.
Round Face Shape
An angular brow that has more height will make a round face appear less round. A high arch will lengthen your face. (avoid rounded brow shapes)
Heart Face Shape
A low rounder arch will soften the pointed chin. If you have a shorter face and want to add length – add a higher arch but still keep it round.
Oblong Face Shape
A straight across, flat brow will makes the face appear shorter by keeping the focus in the centre of your face. (If the flat brow makes your forehead look bigger, try a little contouring around the hairline)
I’ve added a list of facial features you might have and how to minimize them by adjusting your brows!
If you have…
A large forehead
A thicker arched brow will help reduce the appearance of a larger forehead.
A wide nose
Filling your brows in closer together can help make your nose appear more narrow. Be careful not to make them too close as this can make you look angry, or worse… verge on the side of unibrow!!
A small forehead
Keep your brows low and not too arched, adding height to your brows will only make your forehead look even smaller.
Eyes too far apart/too close together
Ideally the space between both eyes should be the same length as the length of one eye. If the space between your eyes is greater then the length of one eye, your eyes are “wide set”. If the space between your eyes is smaller than the length of one eye, your eyes are “close set”.
If you have “wide set” eyes, filling your brows in so that the head of the brows are closer together will draws the focus to the centre of your face making your eyes appear closer together.
If you have “close set” eyes, filling your brows in so the head of the brows are further apart will spread out your facial features and create the appearance of a more open facial structure.
Choosing a Brow Colour
If you have a lot of actual brow hair to work with – match your brow product as best you can to your brow hair color. This is also important if you have very coarse brow hair – going lighter with your brow product while you have dark, coarse brow hairs will cause the real hairs to stand out in comparison to the ones you’re going to draw on. You can still achieve a soft looking brow with a dark pencil (by using less pressure during application) so you shouldn’t choose a lighter shade in hopes of creating a softer looking brow!
If you have little to no eyebrows or have fine brow hair then you can play around with brow color a little more. Typically dark haired people should go 1-2 shades lighter than the color of hair on their head and light haired people should go 1-2 shades darker than the color of hair on their head.
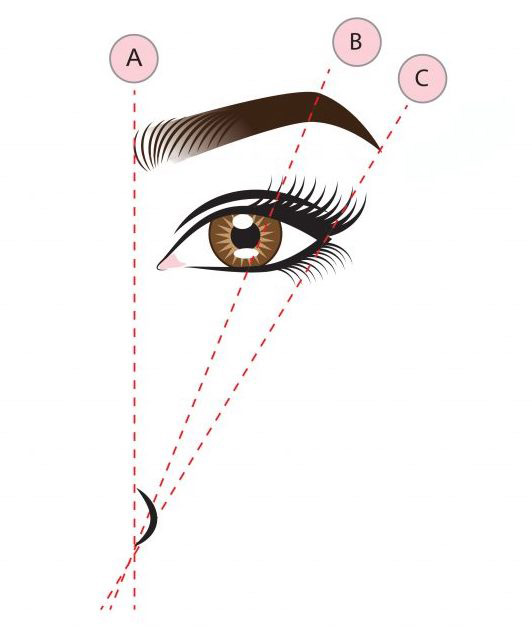
Placement and technique
Taking into account everything I’ve mentioned above – to determine where your brow should start, arch and finish – you can use the dental floss trick.
A – Hold a taught piece of dental floss from the inside edge of your nostril in a straight line straight up to the eyebrow. This marks where the inner edge of the head of the brow should start.
B – For the arch, measure from the outside of your nostril to the outside of your pupil. The arch of your brow should be highest at this point.
C – Measure again from the outside part of the nostril but this time you’re going to take it to the outside corner of the eye. This is where the tail of your brow should end.
Tweezing/Grooming
This can be a slippery slope for many. If you’re like me and went through a Christina Aguilera phase in your younger years… you may not need to tweeze or groom very much as you’re probably now dealing with a lack of brow altogether… (Damned 2000’s)
If this ^ is the case, you can skip this section lol
If you are still blessed with a full set of brows here are a few grooming tips…
Fill in your brows – (read ahead to the “fill in” steps so you can establish a shape before you go nuts with those tweezers)
Once you are happy with the filled in brows – use a white eyeliner to outline what you’ve just filled in. Then white part is where you’ll tweeze. This is an important step for those who get carried away with tweezing.
Gently pull the skin taught and tweeze the hair in the same direction it grows (do not pull the opposite way, this can break the hair mid shaft, and cause damage your skin).
Once you’ve finished tweezing, use a brow spoolie brush to brush the hairs upwards. If you have some really long brow hairs this is when you trim them! Run your brow scissors along the top of your brow and trim ONLY the excess. *Skip this step if you like really fluffy brows*
Fill those babies in
There are many different ways to fill in your brows, as well as many different products. My favourites are brow pencils and brow gels/mascaras.
1. Using light pressure, start at the head of the brow, outline the bottom edge of the brow so you have a guideline, then make small upward strokes along that line that mimic little brow hairs.
2. As you move towards the middle of the brow, start angling the strokes so they’re going from the bottom of the brow upwards and outwards at a 45 degree angle towards your temples.
3. When you’ve reached the arch and finishing off on the tail, change directions of your hair strokes to a downward angle towards the top of your ear. Your tail should come to a nice point.
4. Follow your natural hair growth and don’t draw long lines! the lines should mimic your natural hairs.
After you’ve penciled them in, use a brow brush or clean mascara wand and brush your brows in the same direction you filled them in. (repeat this step as many times as you like until you are happy with the look) This will soften the hard lines you made and make them look more natural.
Continue this until you have your desired shape and color – if you’d like to add a little more depth to your brows, try a colored brow gel/mascara. The gel will grip to the brow hairs and add dimensional. (skip this step if you don’t have a lot of natural brow hair to work with)
The head of your brows shouldn’t angle inwards, they should go straight up and down or angle slightly outwards.
If you have unruly brow hairs but don’t want to add additional color to them, use a clear brow gel to hold those crazies in place, OR… spray hairspray on your brow spoolie and brush the hairs into place.
Ok!! I think that about does it… If you read all this and thought, “ahh hell no – ain’t nobody got time for that” but STILL want gorgeous brows, You should probably consider getting your brows microbladed lol!
Mel T
Posted at 07:56h, 25 MayGreat article! My brows are sparse on the “tails”. They don’t quite end at the corner of my eye. Do you have any tips for regrowth and/or how to pencil this part in while still looking natural? I’ve also considered microblading but am worried about how fake it will look with them just drawn on!
Thanks,
Mel
Kaitlin
Posted at 23:42h, 26 MayIf you go somewhere great they will look more natural than any makeup product for brows!!
Melanie T
Posted at 21:47h, 26 MayGreat post! Do you have any suggestions for brows that are sparse at the tail? Mine don’t quite end at the corner of my eye…I’m concerned about microblading looking too fake..
Pingback:Jillian's Makeup Routine - Kaitlin Hargreaves
Posted at 12:56h, 07 June[…] lean towards each other. The brow should go straight up, or angle slightly outwards. (see brow blog ) The only time the brows should lean inwards is if they’re fluffy stray hairs (not a heavy […]